Monday, September 26, 2011

First Kiln Opening

I have to say I was so excited to open the kiln for the first time.  I had no clue how my pieces would turn out.  I did have one major disaster, a couple of disappointments and some great successes.  I wish I could acutally show how the pieces turned out but it seems the camera made some look better and the good ones look not as exciting, go figure :)

The Good...
The Disappointing...
The disaster...


Thursday, September 8, 2011

Not to worry

Not to worry, I am keeping up with making my pottery.  I think it was getting boring showing unfinished pieces so I decided to post again after I get them glazed.  I am keeping a list of what I made and will post pictures in the order made.  I have completed 25 so far.  The big problem now is getting my hands on some more clay as I am about out.

Thursday, August 25, 2011

Pieces 11, 12, 13

I finished enough pieces to not only keep on track, but to get a little ahead.  I made a couple of textured bowls from the hump molds I made earlier and a nice little dish.  I really like the altered rim on this piece and want to make a few more bowls of various sizes.  So here are my pieces in the order in which they were made...
This was a complete disappointment.  I hate the way the glaze turned out.  Funny thing is the camera actually makes it look decent.  Glaze used Dark Jungle.

Love this piece!  I need to make a much larger piece and heavily texture it.  The inside was nice...
but the outside was amazing (stupid camera, doesn't show how nice it is).


Clay used:  Amaco X-15
Bowls were 2 pounds 8 ounces, plate 3 pounds
Technique: bowls hump molds, place drape mold on a place, altered rim
Glazes used:

Wednesday, August 24, 2011

Keeping up

I have a few more pieces completed to keep up with my piece a day.  I need to get some decent pictures and then I will show them to you. 

Monday, August 22, 2011

Pottery a contact sport?

Having rheumatoid arthritis means having to learn to adapt in many areas of your life.  My RA is particularly bad in my right hand and both wrists.  I found that when I tried to knead clay, it caused a very large amount of pain and more swelling in my effected joints.  So I learned to do what I always do...adapt.  I put on a little vinyl apron I found at the dollar store and use my upper body to compress the clay.  I lift it up, lean down on it and repeat.  Believe it or not, it looks just like the pictures I saw of the proper way to do ram's head kneading.  If I want to, I can spiral knead the clay also.  I have been determined from my first day of the awful diagnosis that I would still do whatever I want even if it takes 3 times longer.

Oh well this is not sob story so on to today's piece.  I needed a couple new soap dishes so came up with this one for my shower bath. 


I also need to replace the one in my large bathroom since it is getting some rust spots so I decided to make a dish to go with the little tumbler I made earlier.

I need to do 2 projects a couple days this week to keep up with my goal of one a day for a year.  I am leaving for a dog show early Thursday and won't be home until Saturday.  Hope no one thinks this is cheating :P 

I almost forgot to mention that I also made 4 hump molds today and cleaned up 6 of my now greenware pieces.  Hope to get the kiln going when I get home from the dog show.

Clay used: Amaco X 15
Starting weight:  didn't weight it
Ending weight: ditto
Technique: first one cut with wiggle wire and tossed, second one slab, textured
Glaze used:

Sunday, August 21, 2011

Baby gift

Ok not a human baby but a gift for Diana's new puppy, Olivia, and her brother.  Diana is going to be getting another puppy really soon and I wanted to make them a cute little gift.  Nothing special but something from me to them.  Not sure how this will be glazed yet but hopefully I will think of something special for their water bowl.


I had run out of my previous clay and picked some up at Hobby Lobby.  Hopefully it is at least a decent clay.  I was disappointed at first as it was rather dry but, I read in the Ceramic Arts Daily forum a way to revive it.  It seems like it worked and I was able to get this completed with little difficulty.

Thought you might like to see a picture of Olivia also.  She is quite a cutie!

A week later Diana came home with this little cutie.  His name is Olivier and he is Olivia's brother.
The dish I made for them turned out really cute!  Again, I wish the camera would do it justice.


Clay used: Amaco X 15
Starting weight:  1 pound 5 ounces
Ending weight: 1 pound 3 ounces
Technique: slab
Glaze used:  Leopard

August 20, Day of the black out

Just as I was getting ready to make my piece yesterday at around 7 pm, bam out went the lights.  I guess I won't complain too much though since they were supposed to be out until tomorrow afternoon.  Diana and I went to Meijer to purchase batteries and other essentials to get through another night without power when just as I predicted, the lights were back on when we got home...with about 50 pounds of ice!

Anyway, I still wanted to make my piece so in the partial dark I began.  This was cathartic for me as I could not get too obsessive with everything being made to perfection.  This is what I came up with...
Wasn't sure what direction I was headed but after I rolled out the clay and impressed it with burlap, my hands headed towards this direction.  Somehow I noticed in the ever dimming light that there was a small hole that needed to be patched.  Once the patch was added, it reminded me of a pair of old farmer's work pants so I added some suspender handles and a couple of all American star buttons.  Not sure what I will do with it, but I think it is kinda cute.

Clay used: Runyan "Stoneware" purchased from a ceramic shop, owner had no clue when I asked her which kind
Beginning weight: 1 pound 3 ounces
Ending weight: 1 pound 2 ounces
Technique:  slab, burlap textured
Glaze used:

Friday, August 19, 2011

Today was use it up day

I had just a small amount of M-11 clay that Juliet had given me and today was about using it up.  I wanted to make a bud vase using the broomstick method so there were no leftovers.  Well it was a bit too tall and I was afraid it would tip so I did a little surgery on it to remove some of the clay and to ease the tipping situation.  This caused a small amount of leftovers though.   Not to worry, I put them to good use.

I made a couple of Christmas ornaments and some butterflies with the scraps.  I think I will make a bunch of butterflies and make necklaces, earrings and bracelets out of them for my papillon show friends.

I did not like the way this piece turned out...too boring for me.  I am going to experiment sometime with putting some other glaze on top to see what happens.


Clay used: M-11
Beginning weight: 1 pound 2 ounces
Ending weight: all used
Technique:  broomstick, alteration, cookie cutters
Glaze used: Cactus ash over Christmas Red

Thursday, August 18, 2011

August 18, Day 5

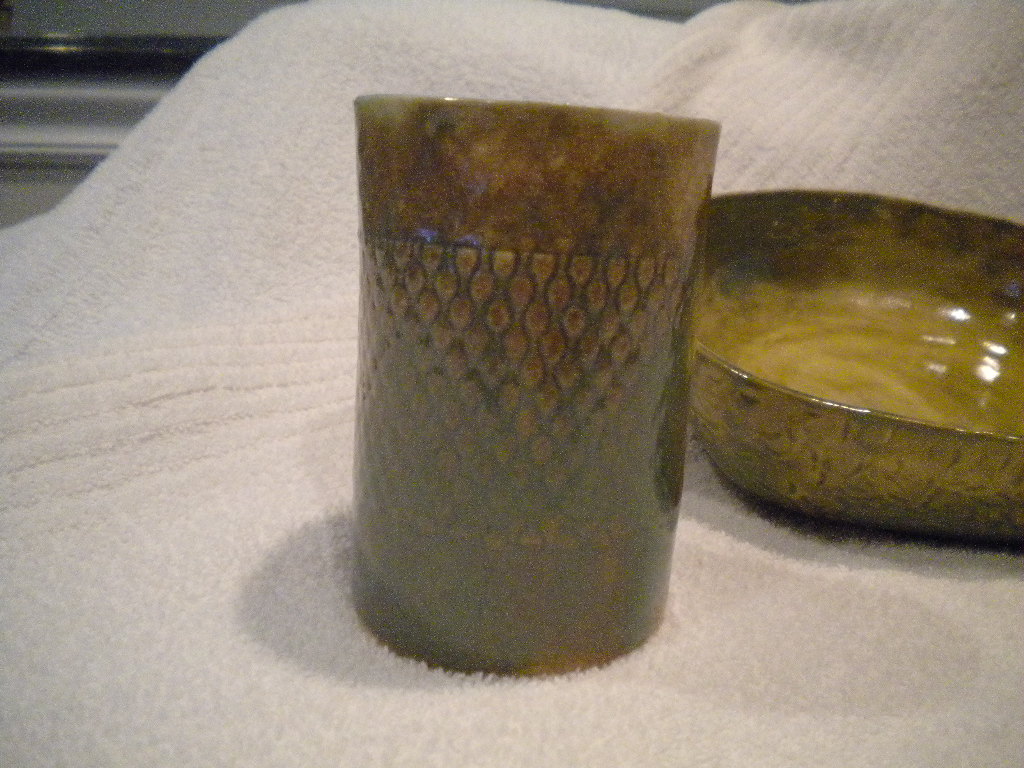
I have this "thing" about a joint on my pieces that are not perfectly smooth.  I have a very hard time when something is textured while first rolling it out that leaves the seam noticeable when made into a cylinder.  My project today was a way of getting myself to let go a little and not to focus too much on what I see as an imperfection.

I was out late tonight and wanted to make a simple and quick project and had planned on making a coffee mug.  Well as we all know, I don't always get things right and my piece changes in concept.  I have a real problem looking at something flat and "seeing" how it will look when round.  I rolled out a piece of clay and textured it.  When I went to put it on the bottom I had made previously, I discovered it simply was too small.  So instead of a coffee mug, I decided to make a cute little drinking cup.


Like I said, I am working on my compulsion to have a perfect seam.  I decided to split the difference, so to speak, and just textured the middle.  That way, I can still smooth out part of the seam while leaving the remainder less than perfect.
Another thing I discovered, I really need to get some better lights in my craft room.  Until I saw the picture, I didn't even notice that some of the texture got impressed in the top portion that was to be flat....I am really wanting to go smooth this out, but will leave it alone :)  I can always do something about it before I fire the cup if it drives me too crazy.

This was a complete disappointment.  I hate the way the glaze turned out....funny thing is though, the camera actually makes it look pretty good.  Not sure what happened, the glaze was extremely thick and I had to add quite a bit of water to make it a brushable consistency, might of been the problem.  Too bad I used it on 2 pieces which ruined them.  Sometime I am going to experiment with putting another glaze on top to see what happens.


I am going to start writing notes to myself in order to keep records of what I am doing, so this is what you will see as a foot note in this and future posts...

Clay used:  M-11
Beginning weight:  1 pound 2 ounces
Ending weight: 9.1 ounces
Technique:  Slab, texture, masking
Glaze used: Dark Jungle

Wednesday, August 17, 2011

Today, finally up to date

 I have no clue how much clay I should be using to make my pottery so today I decided to weigh the clay before getting started.  I cut a piece off my declining hunk of clay that measured 1 pound 4 ounces.   I wanted to make a simple mug using a technique known as the broom stick method.

 As I said before, the pieces I am making seem to be taking on forms other that what I planned.   I discovered that I did not need such a large amount of clay for a simple, small, footed mug.  I made the piece correctly as I had read, but the top was way too heavy for the stem and there was no way to get it properly supported without risk of  breakage.

I decided to trim off the foot area and make a simple bowl.  When I saw the disconnected foot though, I decided it would make a perfect top...this is what today's pot looks like now.  I think I might save this one for my next pit firing.


I like the way this piece turned out.  I used an ash glaze that runs down the sides.  I wish the camera could show you how cool this one actually turned out.

August 16, Day 3

Wanting to make a piece a day meant having to do something rather quickly today.  I went with my friend for a 6 hour journey to visit my friend Judy out near Lansing.  Diana bought a new puppy!  Now we have 4 little ones running around the house...3 of mine and 1 of hers :)

Diana found a really pretty tray at the Dollar Store and I used it to make another drape mold piece.  This time, I sprayed it with cooking oil spray and it did not stick.  The piece of clay I had just fit the mold.  I though the rim was dangerously thin so my quick piece took quite a bit longer.  I decided to add some coils to the handle and lip to make it more sturdy.  It turned out really nice.


Had a disaster and this piece broke before I was able to fire it.  I made a new one that is in the kiln to bisque it.

August 15, Day 2

My plan for the day was to make a 3 footed bowl with a simple texture.  Either the clay was a bit too dry or, most likely, I handled the clay too much.  After making the feet and refining the shape of them, the texture I had added started to look as though the piece had lots of little cracks forming on the surface.  I used a metal rib and removed as much of the texture as possible.  The pot looked too plain to me so I decided to add the lid.  I really like the way it turned out.


This piece turned out to be a complete disaster.  I trusted the woman at the ceramic shop that the glaze I purchased would be ok in the kiln despite it saying cone 06 and I fire to cone 6.  She guaranteed it would work fine...guess she either lied or had no idea what she was talking about.

This was extremely upsetting as this was my mom's favorite piece and was to be her birthday gift.  Looks like I need to make another one for Christmas.

August 14, New day 1

I have been finding out so far that my pieces are not turning out as I originally planned.  I was going to make a simple drape mold berry bowl.  A berry bowl is basically a nice bowl with holes drilled into the bottom and sides and a plate for underneath.  It is used to rinse off various types of berries before you eat them.

I used a kitchen bowl wrapped in plastic wrap.  I didn't want too many wrinkles so decided against wrapping the bowl in newspaper.  Big mistake!  When I attempted to remove the clay bowl, I had to pry it off which stretched the edges quite a bit.

Luckily for me, this was a happy accident.  I decided to alter the "now" rim and came up with the bowl below.  I will make the original berry bowl sometime in the future.  I like the way this one is now and cannot wait to get it glazed.

 Once I get all the pieces fired and glazed, I will update each post with the completed piece.

The completed piece.  Unfortunately, the camera does not do justice to how beautiful this piece turned out!  This piece was given to my mom for her birthday.  She was happy to get my first piece.

August 13, Day Zero

My first attempt at making a piece of pottery was a dismal failure.  I wanted to make a free form basket.  I rolled out the clay and tried to add texture with a doily.  The problem was the edge of the doily had 2 layers and when rolled into the clay, the edges became too thin.  As it dried it began to crack badly so I decided to wad up the clay and begin again the next day. 

Pit fired at home

Alright, I lied.  My next post is about some pit firing Diana and I did at home on August 8.  We purchased a couple pieces of bisque from a ceramic shop to see how we would do at home.  I also refired a piece I had done previously as I was not happy with the way it turned out.  It was the bottom of the piece I made that looked white.   Pit firing can be done rather simply in a small galvanized trash can.  Punch lots of holes in the bottom and around the bottom on the sides....we learned the hard way to make lots of nickle size holes or the darn thing smokes A LOT.  My neighbor complained and since we are not "allowed" to burn in the city I live in, we will have to find some place different next time we are ready.


We used animal bedding wood chips, septic root killer and plain table salt.  You place the pieces into the can and surround them with sawdust alternated with the chemicals.  You then build a nice fire on top and keep it burning well for 2-3 hours.  Then you place on the lid leaving a 2" gap and leave it until the next day.  I will smolder all night and the next morning, hopefully you will get some very nice pieces.  With pit firing, you never know how the flames will paint the pottery.  
This bowl was simply wrapped in steel wool that was pulled into very fine threads.  The rest is the work of the fire.
The large egg on the left was wrapped in wet clay that had some of the root killer and salt sprinkled on it.  I think the root killer was just too large of particles placed too close together.  In the areas were they were spread out, the spots are a nice green color.  The other 2 eggs were just place directly on the sawdust.


This is the piece I previously pit fired.  I was not happy that it was plain white.  I refired the piece in the firing at home after wrapping it in a copper scrubber aka Chore Boy.  I love the way it turned out!

Ok as previously promised...the next post will be the beginning of my 365 days.  Kim

A new direction

I have found a great new hobby in pottery.  I have challenged myself to make a least one piece a day for a year. 

I was at a craft show and found a potter, Juliet Smith, who inspired me.  I fell in love with her pit fired work and asked if she gave classes.  To my delight, she did and my friend Diana and I took a short series of classes in which we made a few pieces.  Near the end of the classes, we pit fired our work.  Upon going back a couple days later to retreive our pieces of work from the pit, I knew I had found a new direction in my crafting hobbies. 


Here are pictures of the pieces I made in those classes.  My next post will show you the 3 pieces  I made on my own at home.  This is a very new experience for me and hopefully my workmanship will improve over the next year.  Enjoy!